
Alternative Alarm Pro eero Wifi Network Configuration Options
Your Alarm Pro Base Station has a built-in eero router that allows you to replace your existing wifi router. It provides internet access by connecting directly to your modem.
If you have an existing eero mesh network setup, we generally recommend adding Alarm Pro as an extender instead of replacing your eero gateway device. Doing so allows you to preserve existing eero features while still supporting Alarm Pro’s advanced functionality listed Alarm Pro Advanced Features Based on wifi Network Configuration chart below.
During an Internet Service Provider (ISP) outage, Alarm Pro takes over as the gateway and provides 24/7 Backup Internet1 connectivity to your eero network. When the internet outage ends, your gateway eero device will resume control of managing your network connectivity and your Alarm Pro will resume extending your eero mesh network.
What if you don’t want to replace your existing non-eero wifi router with the Alarm Pro built-in eero router or you don’t have an eero mesh network already?
You can create a second wifi network (also know as Double NAT-ing) that will operate independently from your primary wifi network. This allows you to use certain features, including 24/7 Backup Internet,2 Extra Data,2 and Ring Edge2 while maintaining your original wifi network and connected devices.
Another option is to put your Alarm Pro’s eero router into Bridge Mode. Doing so will allow your existing router to manage the connection between your wifi network and Internet Service Provider (ISP).
NOTE: When using Bridge Mode, you must connect Alarm Pro to your router via an ethernet cable. Additionally you will lose certain Alarm Pro advanced features, such as 24/7 Backup Internet2 and Extra Data.2 You will however retain the ability to use Ring Edge2 for local video processing.
Alarm Pro Advanced Features Based on Wifi Network Configuration
Alarm Pro's eero Router Network Configuration | Primary Router | Extender | Second Network (Double NAT-ing) | Bridge Mode |
Eligible Ring Subscription 1 | ||||
24/7 Backup Internet | Yes | Yes | Yes | No |
Back Up Data | Yes | Yes | Yes | No |
Ring Edge | Yes | Yes | Yes | Yes |
eero Secure⁴ (Eligible Ring subscription required) | ||||
Advanced security to help protect your connected devices from online threats. | Yes | Yes | Yes | No |
Block a variety of ads on devices connected to your network. | Yes | Yes | Yes | No |
Block or allow specific websites on your network or only on certain profiles. | Yes | Yes | Yes | No |
SafeSearch to help ensure that Google search results are appropriate. | Yes | Yes | Yes | No |
Content filtering allows you to set profile-specific filters for different types of content. | Yes | Yes | Yes | No |
Historical data usage allows you to see daily, weekly, and monthly data usage. | Yes | Yes | Yes | No |
VIP support sends you to the front of the line when you need help. | Yes | Yes | Yes | No |
Learn more about Ring Home Plans
Contact eero support for alternative networking questions
Pros and Cons of Double NAT-ing vs Bridge Mode
Benefits of Setting Up a Second Network (Double NAT-ing)
- There’s no need to replace your existing router with Alarm Pro’s built-in eero router.
- You can keep using your existing wifi network and the devices connected to it as before. (Note: these devices will not be eligible for the benefits for 24/7 Backup Internet).
- You select which wifi devices will have access to Alarm Pro’s advanced features.
- eero Secure⁴ (requires eligible Ring subscription) helps protect the devices connected to your eero network from online threats.
Drawbacks of Setting Up a Second Network (Double NAT-ing)
- Multiple apps required for wifi network and wifi device management.
- The potential for wifi interference caused by running multiple networks in close proximity.
- For homes over 1,500 square feet, additional eero extenders are required for optimal wifi coverage.3
- The additional cost of a wifi network switch if required.
- Alarm Pro must be connected to your existing router via ethernet.
Benefits of Setting Up Alarm Pro in Bridge Mode
- There’s no need to replace your existing router with Alarm Pro’s built-in eero router.
- Existing wifi router manages the internet connection.
- Alarm Pro extends existing network’s wifi signal.
- Reduced network management complexity.
- Ring Edge2is available for local video processing.
- Your existing router will continue to provide coverage to your home, so there’s no need to purchase additional eero extenders.
Drawbacks of Setting Up Alarm Pro in Bridge Mode
- 24/7 Backup Internet2and Extra Data2are not supported.
- eero Secure⁴ (requires eligible Ring subscription) features are not available. You also lose access to the following features:
- Family Profiles
- eero Secure
- eero Labs
- Device bandwidth usage details
- Device blocking
- Advanced network settings management through the eero app.
- Automatic Channel Selection (ACS), which also disables DFS.
- There is an additional cost if a wifi network switch is required.
- Alarm Pro must be connected to your existing router via ethernet.
How to Set Up a New eero Wifi Network (Double NAT-ing)
During Alarm Pro setup in the Ring app, you’ll be directed to the eero app to replace your existing router with the Alarm Pro eero router. Follow these steps:
- Instead of plugging your Alarm Pro directly into your modem (or modem/router combo device) as the eero app suggests, plug Alarm Pro into an open ethernet port on your router.
- Follow the remaining setup instructions in the eero app before returning to the Ring app to complete setup.
If you do not have an open port on your router, see “You May Need to Use an Ethernet Network Switch” below for adding a multi-port network switch.
For homes over 1,500 square feet, an additional eero extender per 1,500 square feet is recommended for optimal wifi coverage. Scroll down to the Connect Your Ring Devices to the New Network section to see how to enable Alarm Pro’s advanced features, such as Ring Edge.2
You May Need to Use an Ethernet Network Switch
If your router (or modem/router combo) does not have an open ethernet port for your Alarm Pro, use a multi-port ethernet network switch.
When using a separate modem and router, it’s important to connect the ethernet network switch to your router; not directly to your modem. This will allow you to use the same IP address provided by your Internet Service Provider (ISP).
Note: Follow the setup instructions provided with your ethernet network switch if you need additional help.
After your network switch is connected to your router, use an ethernet cord to plug the Alarm Pro into an open port before you proceed with setup instructions above.
Use a network name and password for your new eero network that is different from your existing wifi network. If two wifi networks are using the the same network name simultaneously, it will lead to technical complications.
Connect Your Ring Devices to the New Network
Note: After setting up your new eero network, you must connect your devices to it, including Ring cameras and doorbells, in order to use certain features, such as 24/7 Backup Internet,2 Extra Data,2 and Ring Edge.2 Follow these instructions to connect your Ring cameras and doorbells to the new network.
Existing Ring Devices:
Follow these steps in the Ring app to confirm that your existing devices are using the new wifi network:
- Tap the gear icon for your camera or doorbell on the Ring app dashboard, then clickDevice Health.
- Verify that your new eero network name appears in theNetwork Namefield.
- If your device is not using your new eero network clickChange Wi-Fi Networkand follow the onscreen prompts to move the device to your new eero network.
New Ring Devices:
When setting up new Ring cameras or doorbells, you must select your new eero network when prompted to connect to wifi in the Ring App.
Open the Ring app to the main dashboard.
Tap Set Up a Device at the bottom of the screen.
- SelectDoorbellsorSecurity Cams.
- Choose the device name you would like to set up.
- Follow the in-app instructions to complete set up of your new Ring device.
- When prompted, select the wifi network that you prefer for your new Ring device and enter your password to complete setup.
Non-Ring Devices:
If you have other wifi devices that will use 24/7 Backup Data2 and Extra Data2 when needed, ensure that they’re also using your new eero network. Please follow the manufacturer’s instructions on how to change wifi networks for your non-Ring device.
Note: If you have a Ring Chime Pro on your account, select the option to connect to your Home (eero) wifi Network and not your Chime Pro Network when prompted.
How to Manage Devices Between Networks for Non-Ring Devices:
Wifi devices that use your new eero network will no longer appear on your primary wifi network. They must be managed using the eero app. Wifi devices that remain on your primary network will continue to be managed by that network provider’s app.
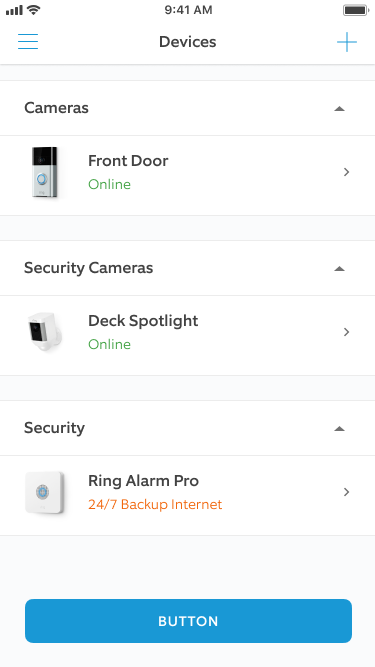
Note: Having two separate eero networks connected via ethernet cable is not recommended. This could cause your Alarm Pro to switch to 24/7 Backup Internet.1 It may not switch back automatically. If that happens, it will continue to consume data until the Alarm Pro is disconnected and the other eero device is reset as the gateway. You’ll know when you are using 24/7 Backup Internet because it will appear as your Ring Alarm Pro Base Station’s connection status. See image below:
How to Set Up Bridge Mode
Create your eero network by following the setup flow in the eero app. The new eero network will start out in NAT mode.
Note: If your network configuration needs Bridge Mode to function, you must first set up your eero network by double NAT-ing. Scroll back up to the How to Set Up a New eero Wifi Network (Double NAT-ing) section to see how to double-NAT your Alarm Pro.
Follow these instructions to Bridge your eeros:
- Open the eero app and tapSettings(bottom right corner).
- TapAdvanced.
- TapDHCP & NAT.
- Switch your selection fromAutomatic(recommended) toBridge or Manual(for those running static IP).
- Tap theSavebutton in the top right corner.
IMPORTANT: Use the same SSID and password as your existing networking setup to avoid conflicts.
You May Need to Use an Ethernet Network Switch
If your router (or modem/router combo) does not have an open ethernet port for your Alarm Pro, use a multi-port ethernet network switch.
When using a separate modem and router, it’s important to connect the ethernet network switch to your router; not directly to your modem. This will allow you to use the same IP address provided by your Internet Service Provider (ISP).
Note: Follow the setup instructions provided with your ethernet network switch if you need additional help.
After your network switch is connected to your router, use an ethernet cord to plug the Alarm Pro into an open port before you proceed with the setup instructions above.
Connect Your Ring Devices
Since Bridge Mode does not replace your existing wifi network, following instructions to add Ring devices to your wifi network as you normally would.
After setting up your Alarm Pro in Bridge mode, you’ll be able to manage which Ring cameras and doorbells are using Ring Edge in the Ring app.
Summary of Bridge Mode vs Double NAT-ing Features & Benefits
Double NAT-ing Your eeros (Having Two Networks with Different SSIDs) | Bridge Mode (Turns off network services but allows eeros to continue providing WiFi access) | |
Home size | More than 1,500 square feet should use an additional eero router. Otherwise wifi devices like doorbells and backyard cameras will not work without additional eero extenders. | Allows you to leverage your existing network coverage. |
Benefits | Double NAT-ing (two networks) is fairly simple, requiring one key step: plug your gateway eero into your existing router (instead of directly into your modem). Continue to use your existing router and network with your Alarm Pro eero router as backup. Additional eero extenders may be added for homes over 1500 square feet. | Continue managing your network through your existing router. Allows your Alarm Pro with eero to continue providing wifi access when needed. This is a solution for Alarm Pro owners who have certain network configurations. |
Additional Information | Be sure to use a network name and password for your eero network that is different from your existing network. Running two networks with the same network name simultaneously could lead to technical complications. | One Alarm Pro eero device must remain wired into the network via ethernet. 24/7 Backup Internet and Extra Data are not available during an internet outage. Your network configuration should not change when in Bridge mode (all connections must funnel through one Gateway eero). You won't be able to manage your network’s advanced features through the eero app. Some eero advanced features will not work. Bridging your eeros is required if your provider is AT&T U-Verse (provides wifi/DHCP) or your ISP requires a specific MAC address matching their provided equipment. |
24/7 Backup Internet 1 | Requires eligible Ring subscription | N/A |
Extra Data 1 | Requires eligible Ring subscription | N/A |
Ring Edge 1 | Requires eligible Ring subscription | Requires eligible Ring subscription |