Mounting Ring Intercom with Double-sided Tape or Screws
Learn how to mount your Ring Intercom with the included double-sided tape or screws.
Mounting Ring Intercom with double-sided tape
Your Ring Intercom comes with double-sided tape on the back for easy installation. The surface of your wall should be smooth and flat.
To secure your Ring Intercom to the wall with the provided tape, simply follow these steps:
- Clean the wall with alcohol.
- Do not use household cleaners or water. Make sure the surface is clean and dry before applying adhesive.
- Find the desired location for placement. Remove the back liner of both tapes.
- Avoid touching the adhesive with your fingers.
- When you have your device aligned straight, press firmly with both hands and hold for 30 seconds to ensure a firm attachment.
How to remove Ring Intercom and double-sided tape
To remove Ring Intercom and the attached double-sided tape from your wall, watch the video above or simply follow these steps:
- Pull off the transparent pull tabs.
- Hold the device with one hand and use the other hand to pull the tape tab slowly and in line with the direction of the tape.
- Pull a few inches of tape and hold the stretched length of tape with your fingers close to the remaining tape.
- Pull off the remaining tape slowly.
Mounting Ring Intercom with screws
Your Ring Intercom comes with mounting screws. If the surface of your wall is textured, wallpapered, non-stick, in an environment with an extreme temperature or humidity level, we recommend installing your Ring Intercom with screws.
To secure your Ring Intercom to the wall with the provided screws, simply follow these steps:
- Remove the faceplate, if attached.
- If mounting on wood surface, screw in your Ring Intercom.
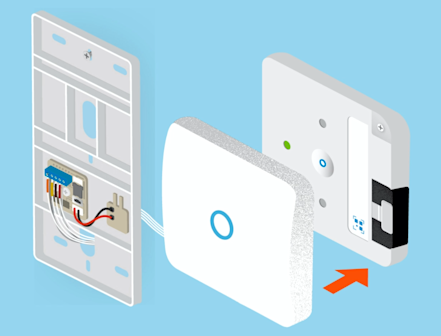
- Place your device at the desired mounting location. You will need to mount it close enough to your existing intercom that the cable can be easily connected.
- Using the included double-sided screwdriver, secure the device with the provided screws.
- If mounting on brick, concrete, or stucco, pre-drill holes for the anchors.
- Use your Ring Intercom mounting holes as a template to mark the install location. You will need to mount it close enough to your existing intercom that the cable can be easily connected.
- Use a power drill and 6 mm drill bit (not included) to drill holes at the desired mounting location.
- Insert the included plastic anchors (6 mm) into the holes. You may need to (carefully) hammer the anchors in.
- Line up your device with the anchors. Using the included double-sided screwdriver, secure the device with the provided screws.
- Reattach the faceplate of your Ring Intercom.