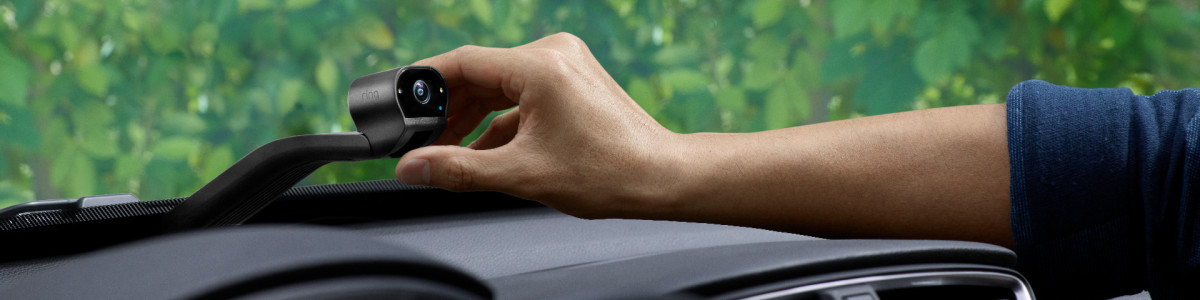
Installing and uninstalling Car Cam
Learn how to properly install Car Cam. Note: Not all vehicles are compatible with Ring Car Cam. Check the list of incompatible vehicles.
Watch the video guide for installing a Car Cam
Parts included in the package
Ring Car Cam (A) |  |
Power Cable (B) |  |
OBD-II Adapter (C) | 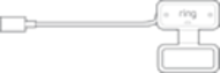 |
Cable Tuck Tool (D) |  |
Cable clip (2-channel) x2 (E) |  |
Cable clip (1-channel) x2 (F) |  |
Holder with strap (G) | 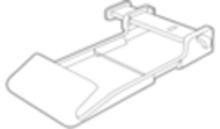 |
Alcohol Wipe (H) |  |
Adhesive Pad for Device x2 (I) |  |
Adhesive Pad for Cable Clip (1-Channel) (J) |  |
Adhesive Pad for Cable Clip (2-Channel) (K) |  |
Step 1: Locate your car’s OBD-II port
- Ring Car Cam must be installed in an OBD-II port located on the driver's left side.
- Check your owner's manual for the location of your OBD-II Port.
Step 2: Drape the power cable along the dashboard
- Uncoil the power cable, and drape it loosely across the dashboard, beginning in the center of your dashboard and draping it toward the driver’s side window.
- The cable positioning doesn’t need to be perfect in this step; you’re simply getting the cable out of the way and placing it approximately where it will go.
- Take the side of the power cable closest to the center of the dashboard, and plug it into Car Cam.
- You will find the port on the narrow end of the device, opposite the cameras.
- Carefully rest Car Cam on top of the dashboard.
Step 3: Plug the power cable into the OBD-II adapter
- Take the opposite end of the power cable that you placed across the dashboard.
- Plug the power cable into the short cable attached to the OBD-II adapter.
Step 4: Plug the OBD-II adapter into your car’s OBD-II port
- Plug the OBD-II adapter into the OBD-II port
- If needed, you can route the short cable attached to the OBD-II adapter along the groove of the adapter’s top cap to keep it tucked away.
- After plugging the OBD-II adapter into the OBD-II port, the light on top of Car Cam will turn on.
- If the light doesn’t turn on, start your vehicle’s engine.
- Wait a few minutes until the light flashes green.
Step 5: Route the power cable
- Starting at the OBD-II port, loosely route the power cable up and over the dashboard on the driver’s left side.
- Run the cable along the base of the windshield and into the windshield gutter.
- Don’t worry about tucking the cable yet, but make sure to tighten the cable slack as you go. There should be no excess or loose cable in the driver’s side footwell.
- Check that the cable length extends to the passenger’s side, beyond the middle point of the dashboard where the device will eventually be installed.
Step 6: Test fit Car Cam
- Keep the adhesive liner on.
- Center Car Cam on the dashboard between the driver’s and passenger’s sides, or slightly to the left or right if there's an obstruction.
- The camera with the Privacy Cover (colored circle) will face the car’s cabin, and the adhesive side faces the windshield.
- Swing the Privacy Cover down to the open position so you can preview the cabin-facing camera after you install Car Cam.
- Push the flat, narrow end of Car Cam into the windshield gutter where there’s a gap between the dashboard and the windshield.
- If it doesn’t fit tightly, try adding the Toe Clip to the bottom of the device to add thickness.
- Once Car Cam fits snugly into the gutter, check that the extra cable length extends to the right of the device on the passenger’s side.
- You can use the narrow end of Car Cam to wedge the cable farther down into the windshield gutter.
Step 7: Clean windshield
- Remove Car Cam from the windshield gutter and set it aside for now.
- Use the alcohol wipe included in the packaging to clean the spot on the windshield where the Car Cam will be installed.
Step 8: Install Car Cam
Note: You can install the Car Cam Holder (sold separately) to help keep Car Cam secure. Learn more about installing the Car Cam Holder. If you are not using the Car Cam Holder, follow these steps:
- Remove the adhesive liner.
- Push the narrow end of Car Cam into the gap between the dashboard and windshield, taking the cable with it.
- Lift the top of the device until the adhesive pad makes contact with the windshield.
- Apply even, gentle pressure for 30 seconds to secure the Car Cam to your windshield.
Step 9: Tuck the power cable
- Starting from the OBD-II port and working up toward the dashboard, use the cable tuck tool to push the cable into the seams and gaps along the edge of the dashboard on the driver’s left side.
- Tuck the remaining parts of the cable into the windshield gutter.
Important! Make sure any loose cable gets tucked away near the driver’s side footwell.
Uninstalling Car Cam
- Gently rock the base of the unit from side to side to loosen the adhesive pad. You can also gently twist clockwise or counter-clockwise to loosen the adhesive pad.
- Leftover adhesive residue on the windshield can be removed with a mild solvent.
- After removing the Car Cam unit, use care when removing cables and cable-routing accessories.
- Be sure to keep the OBD-II adapter and USB cable with the Ring Car Cam unit if you want to install the device in another vehicle.
Last updated 1 month ago