
Physically installing your Stick Up Cam Elite
Physically installing your Stick Up Cam Elite is a simple process. Simply scroll down for a step-by-step guide or watch this video.
Note that you should set up your Stick Up Cam in the Ring app before physically installing it.
Click here for instructions on setting up your Stick Up Cam Elite in the Ring app.
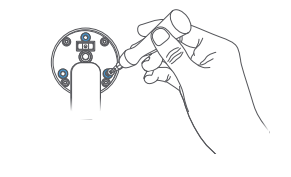
1. Slide off the bottom cover
The first step in installing your Stick Up Cam is sliding off the bottom cover. Use the orange Ring screwdriver included in your box to remove the security screw, then pull off the bottom cover. Once removed, it will reveal a USB port, an Ethernet port, an orange setup button, and a QR code that you'll scan while setting up Stick Up Cam Elite in the Ring app.
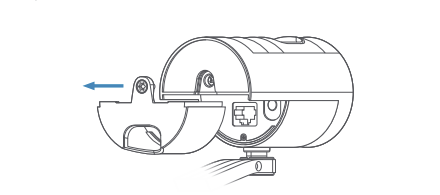
Note: Keep this cover within reach! When you connect your Ethernet cable to the Stick Up Cam, you’ll need to thread the cable through the hole in the cover.
Click here to view a video tutorial about installing your Stick Up Cam Elite on a wall.
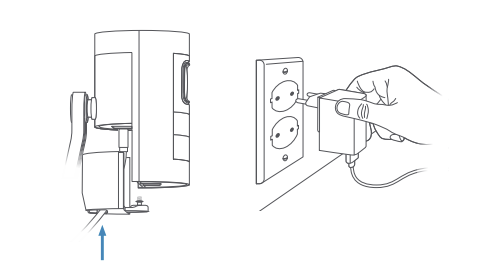
2. Power your Stick Up Cam
To power Stick Up Cam with USB: (For indoor use only)
Feed the included USB cable through the hole in the bottom cover and plug it into your Stick Up Cam. Then, connect the cable to the included USB power supply, and plug the power supply into a socket.
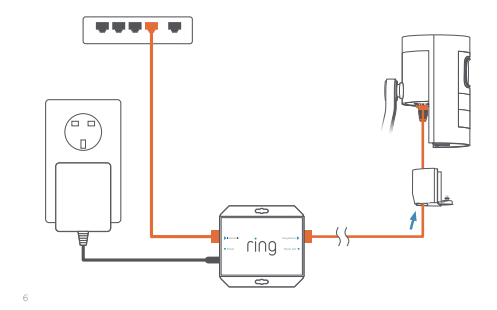
To power Stick Up Cam with the PoE Adapter: (For indoor or outdoor use)
You can power your Stick Up Cam with an Ethernet port that supplies Power over Ethernet.
Note: Your Stick Up Cam requires power via Power over Ethernet. It will not work with only an ethernet connection.
Using PoE requires a router or switch that supplies PoE or the dedicated PoE Adapter that comes in-box with Stick Up Cam Elite.
To power Stick Up Cam with PoE
- Feed an Ethernet cable through the hole in the bottom cover and plug it into your Stick Up Cam.
- Then, hook it up with the included PoE Adapter, following this diagram.
- Feed an Ethernet cable through the hole in the bottom cover.
- Plug the other end of the cable into an Ethernet port that supplies Power over Ethernet.
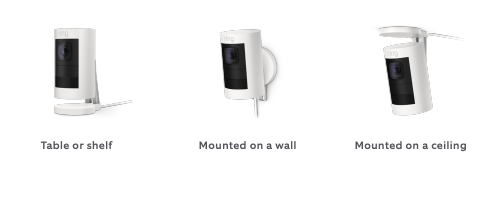
3. Choose your location
Stick Up Cam is happy just about anywhere, indoors or out. It comes ready to sit on a flat surface like a table or shelf, but can also be mounted to a wall or ceiling. Choose a spot where it can provide the view you want, within reach of a power outlet or an Ethernet port with PoE.
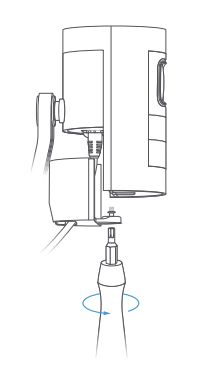
How to use Stick Up Cam on a table or shelf
Make sure that any connected cables have been routed through the hole in the bottom cover. Then, slide the cover into place on your Stick Up Cam. Secure the cover with the attached screw, using the star-shaped end of the screwdriver bit. Finally, place Stick Up Cam in your chosen position. Your Stick Up Cam is now ready to protect you.
How to install Stick Up Cam on a wall:
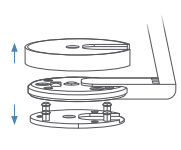
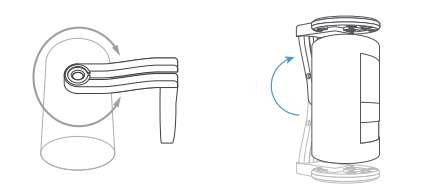
1. Remove the plastic cover and rubber pad from the base. You’ll put the cover back on once you’ve mounted your Stick Up Cam.
2. Flip the base to the rear. The base of the stand is hinged. Before wall-mounting, flip the base down and behind your Stick Up Cam.
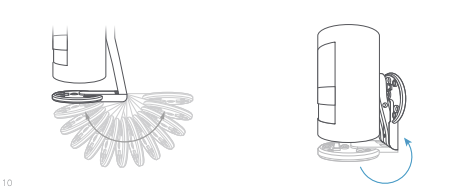
3. Push the rubber pad back into the base. The rubber pad should sit between your wall and the base of your Stick Up Cam.
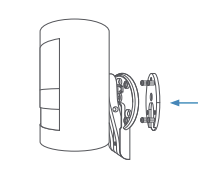
4. Drive the screws. Hold the round part of the base against your wall, rubber side down. Use the integrated level to ensure it’s straight. Then mount it with the included screws.
How to install Stick Up Cam on a ceiling
1. Remove the plastic cover and rubber pad from the base. You’ll put the cover back on once you’ve mounted your Stick Up Cam.
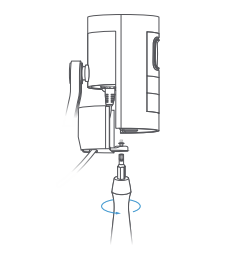
2. Rotate the stand above the camera: The whole stand can rotate on its axis. Before ceiling mounting, rotate the stand 180 degrees so the base is positioned above your Stick Up Cam.
3. Drive the screws. Hold the round part of the base against your wall, rubber side down. Use the integrated level to ensure it’s straight. Then mount it with the included screws.
Note: You will not be able to change the orientation of upside-down videos in the Ring app. Make sure to install your camera the right way up.
Final steps for wall or ceiling mounting
Close it up. Make sure that any connected cables have been routed through the hole in the bottom cover. Then, slide the cover into place on your Stick Up Cam. Secure it with the attached screw, using the star-shaped end of the screwdriver bit.
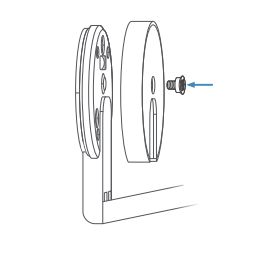
Snap the cover back onto the base. Then, secure it with the included security screw, using the star-shaped end of the screwdriver bit. Now your Stick Up Cam is installed and ready to protect you.
That's it! Your Ring Stick Up Cam Elite is installed.