
Wiring diagrams for battery doorbells
Use wiring diagrams to connect battery-powered doorbells to existing internal doorbell chimes and transformers.
Wiring diagrams for wired doorbells
View wiring diagrams for wired-powered Video Doorbells.
Wiring diagrams for battery-powered doorbells
Make sure to use an AC (alternating current) transformer that is compatible with your internal doorbell chime and Ring doorbell. Learn more about compatible internal doorbell chimes.
Internal doorbell chime terminal guide:
- Trans = Transformer connection
- FRONT = Front (or primary) doorbell connection
- REAR = Back (or secondary) doorbell connection
Wiring one Ring doorbell
One doorbell to one internal doorbell chime
- One doorbell wire is directly connected to yourtransformer. One wire from yourtransformeris connected to theTRANS(transformer) terminal screw on your internal doorbell.
- The second doorbell wire is connected to theFRONTterminal screw on your internal doorbell.

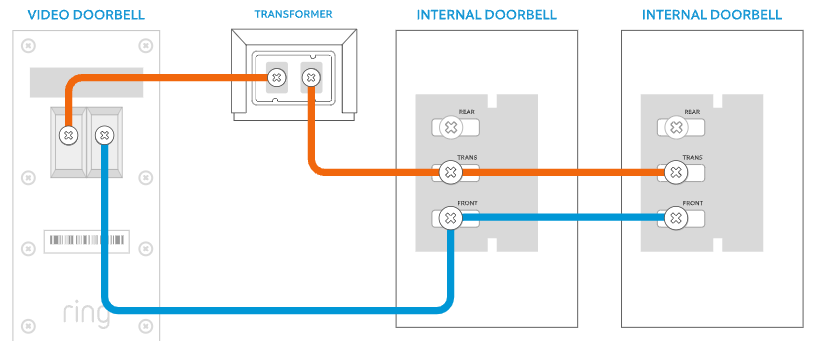
One doorbell to two internal doorbell chimes
- One doorbell wire is directly connected to yourtransformer. One wire from yourtransformeris connected to theTRANS(transformer) terminal screw on one of your internal doorbells.
- TheTRANSwire will be connected to theTRANSterminal on any other internal doorbell chimes in your home.
- The second doorbell wire is connected to theFRONTterminal screw on one of your internal doorbells.
- TheFRONTwire will be connected to theFRONTterminal on any other internal doorbell chimes in your home.
One doorbell to three internal doorbell chimes
- One doorbell wire is directly connected to yourtransformer. One wire from yourtransformeris connected to theTRANS(transformer) terminal screw on one of your internal doorbells.
- TheTRANSwire will be connected to theTRANSterminal on any other internal doorbell chimes in your home.
- The second doorbell wire is connected to theFRONTterminal screw on one of your internal doorbells.
- TheFRONTwire is connected to theFRONTterminal on any other internal doorbell chimes in your home.

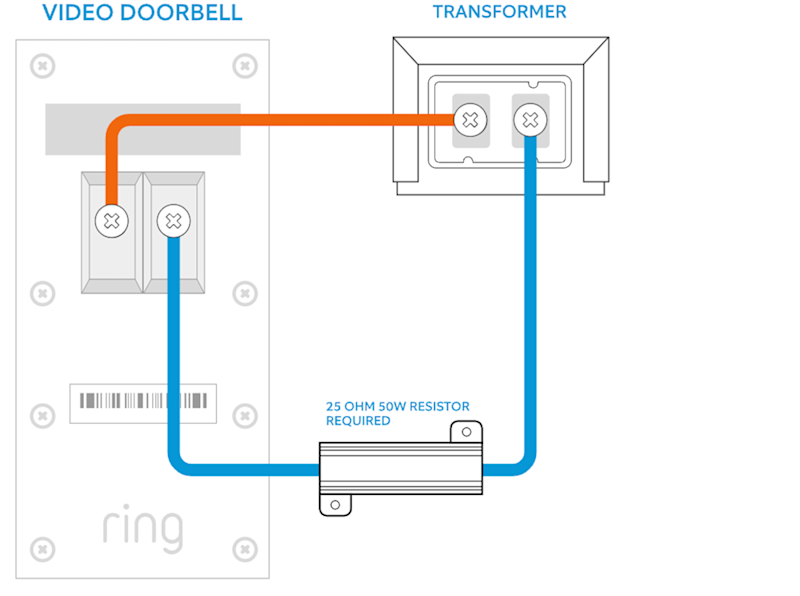
One doorbell directly to a transformer with resistor
This set up is only applicable for Video Doorbell (1st Gen) and Video Doorbell 2. For other doorbells, you do not need a resistor. However, you will need to update the in-app settings for Chime Type to None.
- One doorbell wire is directly connected to yourtransformer.
- The second doorbell wire is connected to aresistor. The other end of the wire is connected to the unused terminal screw on yourtransformer.
- Resistor requirements:25 OHM / 50W.
Wiring two Ring doorbells
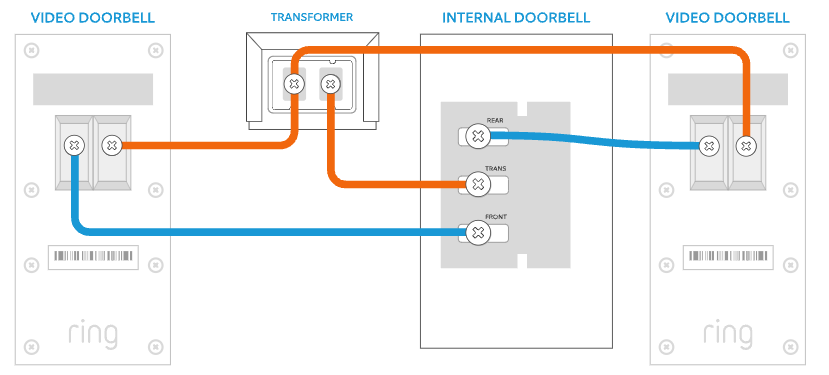
Two doorbells to one internal doorbell chime
- One doorbell wire from each Ring doorbell is directly connected to yourtransformerusing the same terminal screw. The wire from yourtransformeris connected to theTRANS(transformer) terminal screw on your internal doorbell.
- The second doorbell wire on one Ring doorbell is connected to theFRONTterminal screw on your internal doorbell.
- The second doorbell wire on the second Ring doorbell is connected to theREARterminal screw on your internal doorbell.
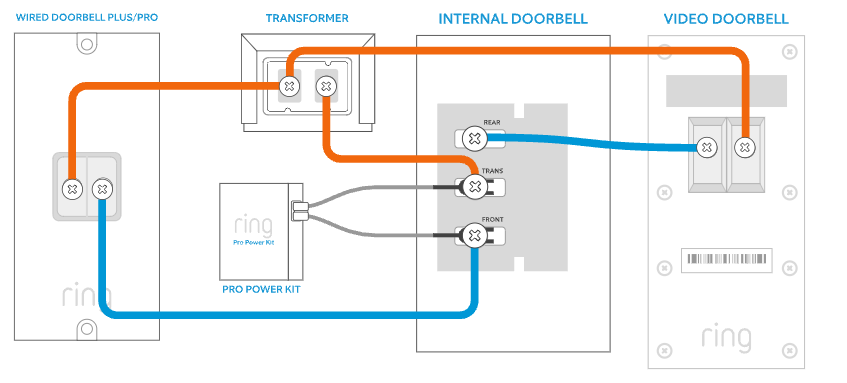
One battery doorbell and one Video Doorbell Plus/Pro to one internal doorbell chime
- One doorbell wire from each Ring doorbell is directly connected to yourtransformerusing the same terminal screw. The wire from yourtransformeris connected to theTRANS(transformer) terminal screw on your internal doorbell.
- The second doorbell wire on one Ring doorbell is connected to theFRONTterminal screw on your internal doorbell.
- The second doorbell wire on the second Ring doorbell is connected to theREARterminal screw on your internal doorbell.
- The Pro Power Kit wires connect to theTRANSand eitherFRONTorREAR(correlate to where your Video Doorbell Plus/Pro is connected) terminal screws on your internal doorbell.
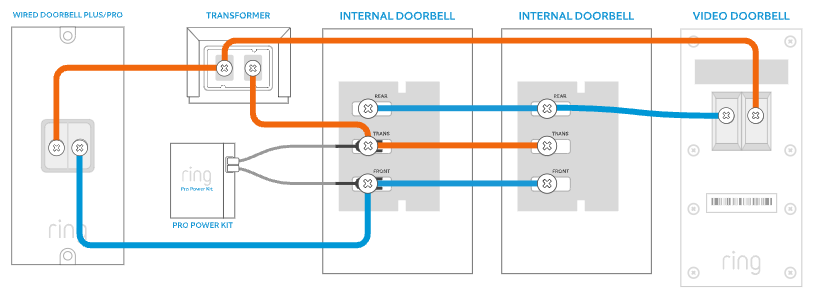
One battery doorbell and one Wired Doorbell Plus/Pro to two internal doorbell chimes
- One doorbell wire from each Ring doorbell is directly connected to yourtransformerusing the same terminal screw. The wire from yourtransformeris connected to theTRANS(transformer) terminal screw on one of your internal doorbells.
- TheTRANSwire will be connected to theTRANSterminal on any other internal doorbell chimes in your home.
- The second doorbell wire on one Ring doorbell is connected to theFRONTterminal screw on your internal doorbell.
- TheFRONTwire is connected to theFRONTterminal on any other internal doorbell chimes in your home.
- The second doorbell wire on the second Ring doorbell is connected to theREARterminal screw on one of your internal doorbells.
- TheREARwire is connected to theREARterminal on any other internal doorbell chimes in your home.
- The Pro Power Kit wires connect to theTRANSand eitherFRONTorREAR(correlate to where your Video Doorbell Plus/Pro is connected) terminal screws on your internal doorbell.
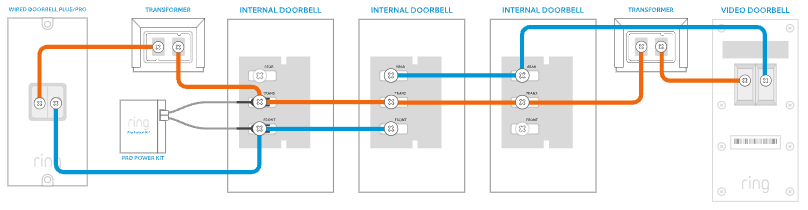
One doorbell and one Wired Doorbell Plus/Pro to three internal doorbell chimes
- One doorbell wire from each Ring doorbell is directly connected to yourtransformerusing the same terminal screw. The wire from yourtransformeris connected to theTRANS(transformer) terminal screw on one of your internal doorbells.
- TheTRANSwire will be connected to theTRANSterminal on any other internal doorbell chimes in your home.
- The second doorbell wire on one Ring doorbell is connected to theFRONTterminal screw on your internal doorbell.
- TheFRONTwire is connected to theFRONTterminal on any other internal doorbell chimes in your home.
- The second doorbell wire on the second Ring doorbell is connected to theREARterminal screw on one of your internal doorbells.
- TheREARwire is connected to theREARterminal on any other internal doorbell chimes in your home.
- The Pro Power Kit wires connect to theTRANSand eitherFRONTorREAR(correlate to where your Video Doorbell Plus/Pro is connected) terminal screws on your internal doorbell.
Last updated 4 weeks ago