
How to physically install your Ring Video Doorbell (2nd Generation) with an existing doorbell
For safety and compliance information for this product, click here.
View/download PDF manual (English, Français, Deutsch, Italiano, Español, Nederlands, Svenska, Dansk, Suomi, Norsk, العربية)For your safety, only use an existing doorbell transformer within the range specified below or compatible Ring accessories to power your device.
For connecting to an existing doorbell system:
- Hardwired transformer (8 to 24 VAC, 50/60Hz, 5VA to 40VA)
Ring accessories are sold separately and may include:
- Plug-In Adapter (24Vdc, 500mA)
- Solar Charger (5.2Vdc, 100mA or 109mA)
- Solar Panel (5Vdc, 380mA/480mA/800mA)
Using incompatible power sources can damage your device and cause electric shock.
Note that you should set up your Ring Video Doorbell in your Ring app before mounting it to your home.
Setting up your Ring Video Doorbell (2nd Generation) in the Ring app.
Included installation hardware

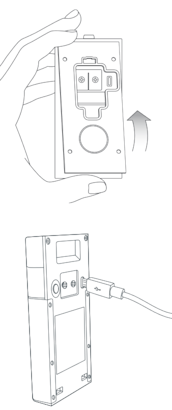
1. Charge the built-in battery
- Fully charge the built-in battery by plugging it into a USB power source using the provided orange cable.
- When only one of the two LEDs on the battery is lit, the battery is fully charged.
Click here for more information on charging your Ring battery.
2. Set up your Ring Doorbell near your wifi router
In the Ring app, select Set Up a Device and follow the in-app instructions.
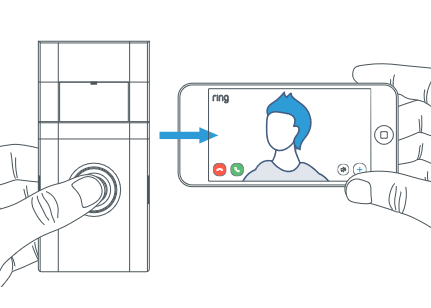
3. Try it out
After setup, push the button on the front of your Ring Doorbell to see video from the camera in the Ring app.
If you have problems with video quality after installation, you may need to move your router closer to your door, or add a Ring Chime Pro. Learn more at ring.com/chime-pro.
4. Install your Ring Video Doorbell (2nd Generation)
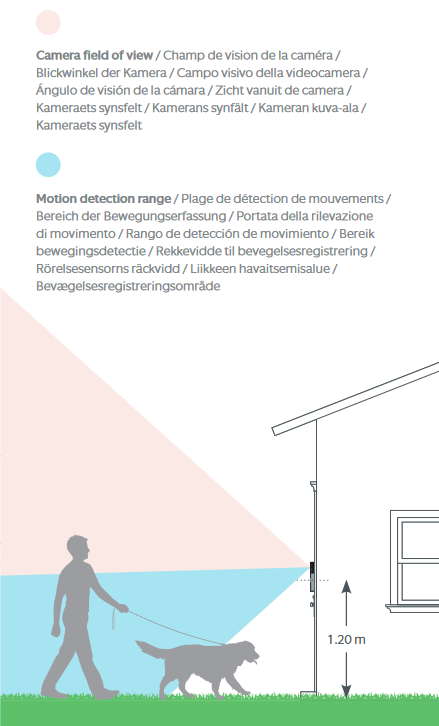
For the best results, mount it around 1.2 metres above the ground.
If you're connecting to existing doorbell wiring that's higher than four feet and want to angle your Ring Doorbell down for a better view, you can purchase a Wedge Kit online at ring.com/accessories.
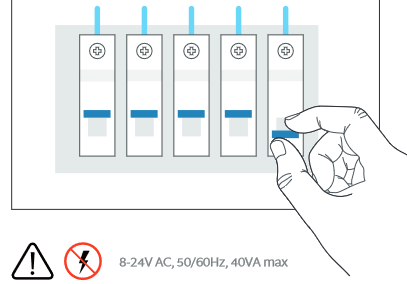
5. Turn off the power to your existing doorbell and remove it
Turn off power at the consumer unit.
Once power is turned off, remove the doorbell button from the wall and disconnect the wires.
Your Ring Doorbell is compatible with doorbell systems supplying 8 to 24 VAC, 50/60Hz, 5VA to 40VA.
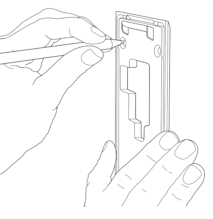
6. Mark the screw holes
Use the bracket as a template to mark the four corner holes.
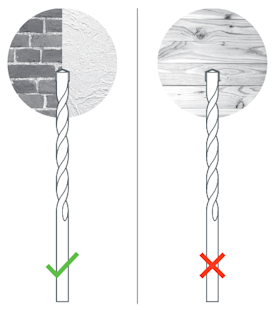
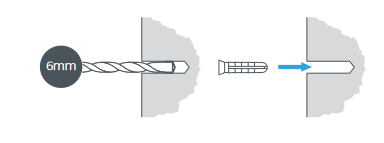
7. Optional: Install the wall anchors (only when mounting on brick, concrete or stucco)
- If installing on stucco, brick, or concrete, use a 6mm drill bit in a power drill to drill holes at the positions you marked.
- Insert the included plastic anchors into the holes. You may need to use a hammer to get the anchors in.
- If you’re installing on wood, skip this step.
8. Install the mounting bracket
Feed the wires through the hole in the mounting bracket.
Using a Philips head screwdriver, drive the mounting screws from Bag A into your wall (or into the anchors, if installed) until they are flush with the mounting bracket.

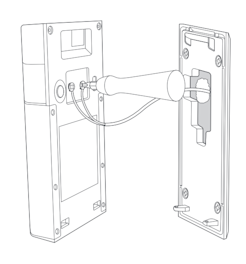
9. Connect the wires
Connect the wires coming out of your wall to the screws on the back of your Video Doorbell. Either wire can connect to either screw. The order doesn’t matter.
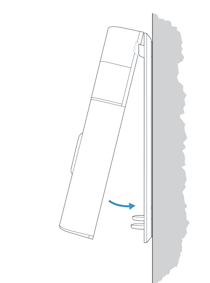
10. Attach your Ring Video Doorbell to the mounting bracket
Hook the slot on the rear of your Ring Video Doorbell onto the tab near the top of the mounting bracket.
Then, let the doorbell pivot down to sit flush on its bracket.
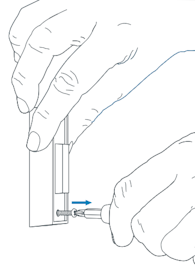
11. Secure your doorbell
CAUTION! If you use the wrong screws to secure your Video Doorbell, you could damage the battery during installation, create a fire hazard, and be seriously injured.
DO NOT USE any other screw other than the included short security screws when securing your Ring doorbell to the bracket. Use the star-shaped end of the included screwdriver to insert and tighten two of the security screws from bag B into the bottom of your Ring doorbell.
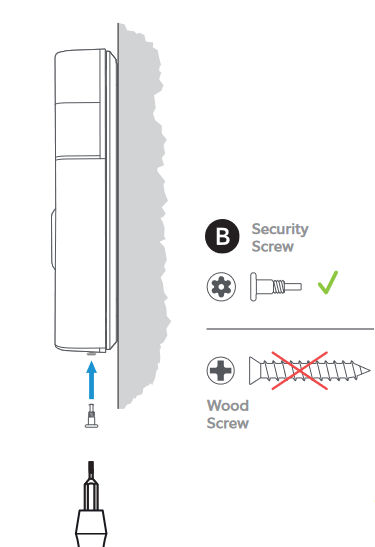
If you think you may have used the wrong screw to install your doorbell, please contact Ring Customer Support.
12. Restore power at the consumer unit
Turn power back on at the consumer unit. It may take a moment for your Ring Doorbell to power on. You'll know it's ready once it lights up and speaks.
Once you have hardwired your Ring Video Doorbell (2nd Generation) to your existing doorbell system, you can set up an in-home chime in the Ring app if want to still hear your old chime. Learn how to configure your doorbell for an in-home chime.