
Installing Your Ring Battery Doorbell Plus
Download/view the manual (US English, French Canadian and Latin American Spanish).Upgrading from an older Ring Doorbell?
Ring Battery Doorbell Plus is compatible with all Ring Video Doorbell 3, 3 Plus, and 4 accessories, including:
- Mounting bracket and screws
- Solar Panel for Doorbells
- Solar Charger for Battery Doorbells (2nd Generation)
- No-Drill Mount
- Wedge Kit
- Corner Kit
Learn more about compatible accessories for your Ring device(s).
Installing your Battery Doorbell Plus
For your safety, only use an existing doorbell transformer within the range specified below or compatible Ring accessories to power your device.
For connecting to an existing doorbell system:
- Hardwired transformer (8 to 24 VAC, 50/60Hz, 5VA to 40VA)**
Ring accessories are sold separately and may include:
- Hardwired Transformer (16 VAC, 30VA)
- Plug-In Adapter (24Vdc, 500mA)
- Solar Charger (5.2Vdc, 100mA or 109mA)
- Solar Panel (5Vdc, 380mA/480mA/800mA)
Using incompatible power sources can damage your device and cause electric shock.
Hardware included
- Wall Mounting Screws
- Wall Anchors
- Security Screws
- Short Bracket Screws
- Medium Corner Mounting Screws
- Wall Anchors
- Wire Nuts
- Wire Extenders

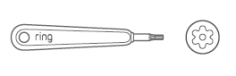
Tools included
- Security Screwdriver
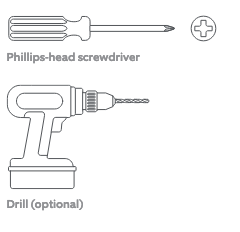
Tools needed
- Phillips-head screwdriver
- Drill (optional)
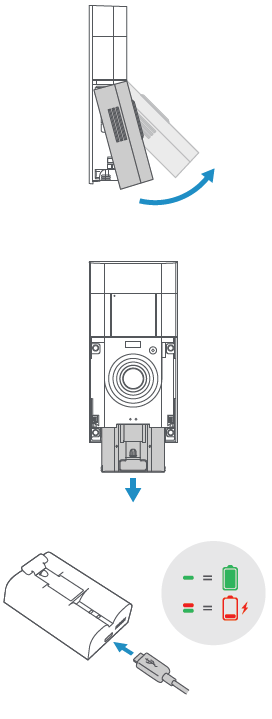
Remove protective film from device. This ensures your device works properly.
Remove the faceplate and fully charge the battery.
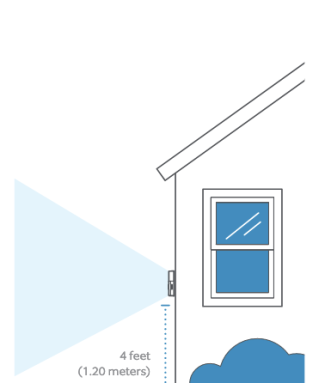
Choose a location for your doorbell.
For the best results, mount the doorbell about 4 feet (1.20 meters) above the ground.
If you want to angle the doorbell down for a better view, wedge kits are available at ring.com/accessories.
Install your doorbell without connecting to an existing Chime
1. Optional: Install the corner mount.
If installing on a wood surface, screw the bracket directly into the wall.
If installing on a masonry surface, mark two screw holes using the bracket as a guide.
Drill pilot holes using a 1/4" drill bit. Insert the wall anchors from Bag C, then drive the medium bracket screws through the bracket into the wall anchors.
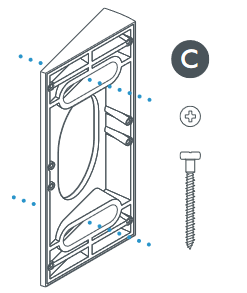
WARNING! Only use the included corner bracket screws when securing the corner bracket.
CAUTION! Do not drill or drive screws into your home's electrical wiring.
2. Mount your doorbell to the wall or corner bracket.
Remove the short mounting screws from Bag A.
If installing on a wood surface, screw the doorbell directly into the wall.
If installing on a masonry surface, mark 4 screw holes using the doorbell as a guide. Drill pilot holes using a 1/4" drill bit. Insert the wall anchors, then drive the short mounting screws through the mounting plate into the wall anchors.
If using a corner mount, use the short bracket screws from Bag C to secure your doorbell to the bracket.
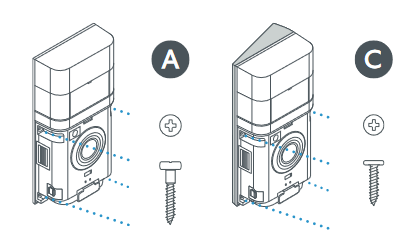
WARNING! Only use the included corner bracket screws when securing the corner bracket.
WARNING! Only use the included wall mounting screws when securing the doorbell.
CAUTION! Do not drill or drive screws into your home's electrical wiring.
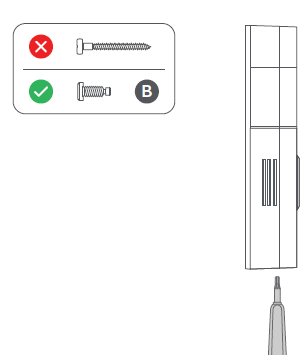
3. Insert the battery and secure the faceplate.
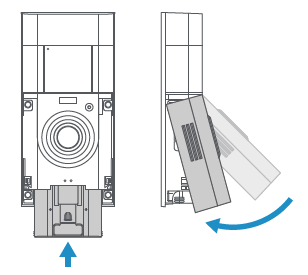
CAUTION! If you use the wrong screws to secure the faceplate, you could damage the battery during installation, create a fire hazard, and be seriously injured.
DO NOT USE any screw other than the included short security screws when securing the faceplate. Lastly, use the included screwdriver to insert and tighten one of the security screws from Bag B.
Your Ring doorbell is now ready to use.
Install your doorbell and connect to an existing chime
Your battery doorbell can be hardwired to work with your home's existing chime.
Before you start installing your doorbell, make sure to shut off power at the breaker. If you're not sure which breaker controls your doorbell, turn off your home's master breaker or contact an electrician.
Once power is turned off, remove your existing doorbell button from the wall and disconnect the wires. Your Ring doorbell is compatible with doorbell systems supplying 8 to 24 VAC at 50/60Hz, 5VA to 40VA.
CAUTION! You'll be working with electrical wires during the install process. If you are uncomfortable or inexperienced with doing so, consult with a licensed electrician. Do not wire your Ring doorbell to a DC-powered intercom system or other DC power source.
1. Optional: Install the corner mount.
If you're installing a corner mount, remove the corner bracket screws from Bag C.
Pull your home's existing wires through the center of the corner mount before installing on the wall.
If installing on a wood surface, screw the bracket directly into the wall.
If installing on a masonry surface, mark two screw holes using the bracket as a guide.

WARNING! Only use the included corner bracket screws when securing the corner bracket.
CAUTION! Do not drill or drive screws into your home's electrical wiring.
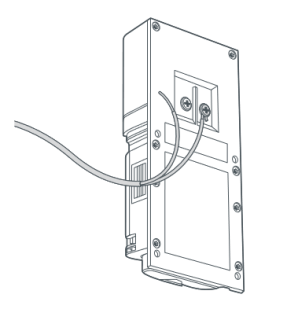
2. Secure the wires to the terminals.
Loop each doorbell wire around the screw terminals on the back of the doorbell, then tighten to secure. It doesn't matter which wire connects to which screw.
If the wires are too short to reach the doorbell, use the wire extenders with the wire nuts found in Bag D.
At the end, feed all the wires (and wire nuts and extenders if used) back into your wall.
3. Mount your doorbell to the wall or corner bracket.
Remove the short mounting screws from Bag A.
If installing on a wood surface, screw the doorbell directly into the wall.
If installing on a masonry surface, mark four screw holes using the doorbell as a guide. Drill pilot holes using a 1/4" drill bit. Insert the wall anchors, the drive the short mounting screws through the mounting plate into the wall anchors.
If using a corner mount, use the short bracket screws from Bag C to secure your doorbell to the bracket.
WARNING! Only use the included corner bracket screws when securing the corner bracket.
WARNING! Only use the included wall mounting screws when securing the doorbell.
CAUTION! Do not drill or drive screws into your home's electrical wiring.
4. Insert the battery and secure the faceplate.
CAUTION! If you use the wrong screws to secure the faceplate, you could damage the battery during installation, create a fire hazard, and be seriously injured.
DO NOT USE any screw other than the included short security screws when securing the faceplate. Lastly, use the included screwdriver to insert and tighten one of the security screws from Bag B.
Your Ring doorbell is now ready to use.